October is the month where I am able to take a shovel to my office. Stacks of books I read (or intended to read) over the summer mingle with sidewalk chalk and bubbles on a shelf. Lesson plans and curriculum to review is shoved to a corner of my desk. Foam fingers and piles of name tags from Welcome Back Sunday linger in a corner. I know that if I don’t organize now that I won’t have room for the Advent candles, devotionals, and Christmas materials that are on the way. Keeping organized in children, youth, and family ministry is an ongoing challenge. No matter the size of the church, or if the focus is children, youth, families or a combination, I have identified three must-have storage areas:
Weekly Supply Storage
Whether you have one or twenty groups of children, youth, or families meeting each week, things run more smoothly when there is space to organize lessons, activities, and supplies. Youth group needs rubber chickens this week? Put it in the bin (and save your desk from mayhem!).
Contents:


- Lesson plans
- Supplies
- Check-in station supplies
- Gathering and welcome supplies
- Extra office supplies
- Midweek youth group supplies
Storage Options:
In the church I serve currently we cleared out a hallway closet just outside my office door. We re-purposed an existing plastic drawer system, designating a bin for each grade level. As we plan during the week, we add supplies needed to the bin. Another shelf holds larger bins, one for midweek youth group supplies and another for our check in table supplies (name tag printer rolls, clipboards, signs and table coverings).

When I served a smaller church I purchased a used 12 drawer IKEA TROFAST shelf system from an online marketplace. Three age level classes x 1 drawer per week meant that I had space for four weeks of lessons and materials in one slim unit that remained in my office. Dry erase drawer labels ensured that everything was well marked and easy for volunteers to find.
The Room of Requirement
a.k.a. The Craft Closet
Harry Potter fans will get the reference to something we’ve all experienced: standing at the door of a jumbled room of craft supplies and finding our eyes drawn to exactly the thing we need for an upcoming event. We’ve all got one of these spaces, and organizing it always seems to get pushed down the to do list. You never know what intriguing items you will find in a craft room excavation. A complete set of Old Testament Film strips from 1960 along with the projector once helped create a throwback Sunday school summer worship service. At another church I found a giant ceramic chalice that’s purpose is still a mystery.

Contents:
- Art supplies including paints, brushes, crayons, markers, paper etc.
- Outdoor equipment including balls, hula hoops, cones.
- Board games
- Paper goods and supplies for snacks and meals.
Options:
Whether this is a corner of your classroom, a cabinet or an entire closet, create spaces for each category of material – keep crafts with crafts and games with games. I prefer having uniform bins to hold craft supplies. My favorite are the IKEA GLES plastic bins, measuring 11x15x7.75 inches. They are economically priced at $1.50 each. I purchased some of these 20 years ago for by kindergarten classroom. IKEA is still making them, though they change the colors periodically. Another option, if you prefer transparent or lidded items are the SAMLA boxes.
Seasonal Storage
Not just for Advent, Christmas, Lent, and Easter, seasonal storage can include sensory table items (shells for Baptism of the Lord) special family worship supplies (crowns for Christ the King Sunday) and more. Having an organized place for these occasional but important symbols ensures your daily work space is clean and clear.
Contents:

- Advent wreaths
- Pageant costumes and manger
- Felt liturgical colors and altar decor for children’s chapel
- Shells, sand, and other seasonal sensory table items
- Seasonal special family worship supplies
- Easter flower cross
- Banners and art for children’s spaces
Options:
Depending on the amount of materials you may need anything from a small cabinet to a large closet. Other churches I have served use the attic for large items like the manger. In previous churches I have served medium sized plastic baskets labeled with the seasons held everything I needed in a re-purposed TV media cabinet (someone in your congregation has one they are hoping to get rid of!) in my office. Currently my church has a walk-in closet that holds racks of pageant costumes, the Easter flower cross, and boxes of Christmas decor. As this church is over 120 years old there are some vintage treasures in this closet – which is on the list to reorganize.
Three Bonus Tips
- Re-purpose First: While it is tempting to go out and buy all the bins, I encourage you to reuse and recycle when possible. Local online marketplaces and thrift stores are a good source of gently used items. When I must buy new bins, I buy from places like IKEA, where I know their storage system sizes remain consistent for decades.
- Try new craft supplies: Get out of the crayon rut with high-quality craft supplies that are more versatile. Watercolor crayons, tempera sticks, and tempera block paints create rich colors offer new experienced for kids, without the mess of liquid paints.
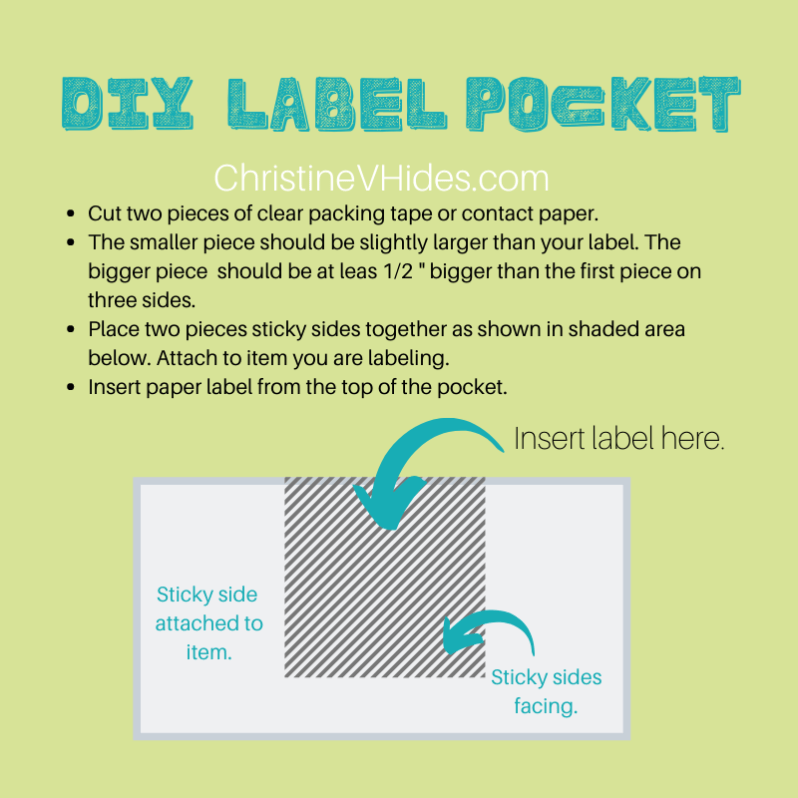
- Reusable Labels: There are a variety of dry erase labels both sticky and magnetic that can be used for bins, cabinets, file folders and more. These are super versatile. I’ve also made DIY pockets for paper labels to slip into using clear tape or contact paper. (See the instructions in the image).
Note: I do not receive any money from advertisers for this website. When I recommend a product it is because I have found it truly helpful.

One thought