No welcome desk? No electronic check in system? No budget? No problem!
In September my church implemented a much needed online registration and Sunday morning check in table. We faced several challenges: our lovely building does not have a children’s welcome desk or large lobby, our current database does not have check in functionality, we did not have a first time visitor process, and some of our children had incomplete records.
Knowing that a new church database system would make our solution a fairly temporary one, we implemented a process that would be both accurate and budget friendly. Having had four months to adapt and reflect upon our solution, here are the supplies and steps I recommend:
Step One: Plan the Process Flow
Think about the registration process from beginning to end from a parent’s perspective. Since we knew this would be a new for our congregation, we started communicating in July with the online link to the registration form. We also expected parents who had not yet registered to come to rally day, so we had extra paper forms on hand. The first few Sunday mornings we had a line and some minor push back. But, we were kind but firm in asking people to complete the forms before check in, emphasizing child safety. One of the best decisions we made was to include parent volunteer opportunities, photo and release permissions, and midweek youth group registration all on the same form.
Step Two: Identify the check-in location
Since we do not have a large lobby or a permanent welcome desk, our check in table needed to be compact and portable. We have a two step process. First, children come to the folding check in table by the front doors. Those who have registered are given a name tag. They then proceed to their classrooms where attendance is taken. Parents who have not registered their child do so at the check in table. Previously our Sunday school teachers were asked to collect registration forms. This new system lets teachers focus on greeting and welcoming children and ensures that every child is registered..
Supplies: Less than $200
On the software side we needed an online registration form and name tag printing software. We use Jotform for many of our church sign-ups, so we also used that for registration. Google forms is another free option. A colleague recommended NameBadger by Sunday Software to print name tags. Available for PC, for less than $40, I have found it to be pretty straightforward and quick enough to use as children walk up to check in.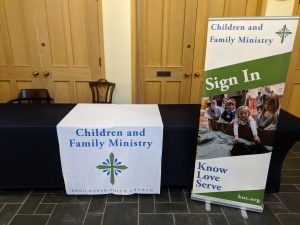
Other supplies included an $80 thermal label printer connected to an old laptop from another ministry. To give the table a more professional and welcome feel, I purchased a stretchy tablecloth often used for trade shows, a custom table runner with our logo, and a roll up check in sign.
People Power:
We have found that it works best to have three adults at our check in station: One who uses the laptop to print name tags on demand, one who checks out paper list to see that students are registered, and one who welcomes everyone and walks visitors to their classrooms.
You cannot communicate enough about new systems. Share your registration link as early as possible. Use email, text, church newsletters and bulletins to get the word out about how to register and why the new system is being implemented. Don’t forget to include the registration link on your website, too!
One final tip:
Make sure to enter the updated information from the registration forms into the church database! Accurate information is vitally important church ministry. And, if you do switch databases, you will have the cleanest data possible to import into the new system!

One thought